
Many gardeners appreciate the convenience of having raised garden beds. However, many new gardeners find filling it quite a daunting task, especially when on a budget.
These raised garden beds offer not only convenience but also many benefits. The only downside of having such beds is that you have to fill them up occasionally.
Things you can use to fill a tall, raised garden bed are: leaves, grass clippings, fruit and vegetable scraps, tea leaves and tea bags, coffee grounds, compost, manure, seaweed, newspapers, cardboard, spent blooms, pine needles, and peat moss. Prepare the area, and then, utilizing what is known as the lasagne method, make seven layers using these materials. Then wait for Spring, plant and water.
With your raised garden bed created, we will now explain to you how to fill a raised garden bed:
How to Fill a Raised Garden Bed
Such a garden bed needs a mixture of compost and soil. There are many methods you can use to fill a raised garden bed:
You can layer the soil and compost, popularly known as lasagna gardening, or you can thoroughly mix the soil and compost. Either method is effective, but lasagna gardening is easier and cheaper for a tall raised garden.
Lasagna gardening is known as a no-tilt and no-dig gardening method. It creates a garden bed with fluffy and rich soil with minimal effort.
The only thing required from you is the ability to use a shovel and a trowel and be able to bend. It will also make your flower bed have fewer pests, fewer weeds, and a productive yield.
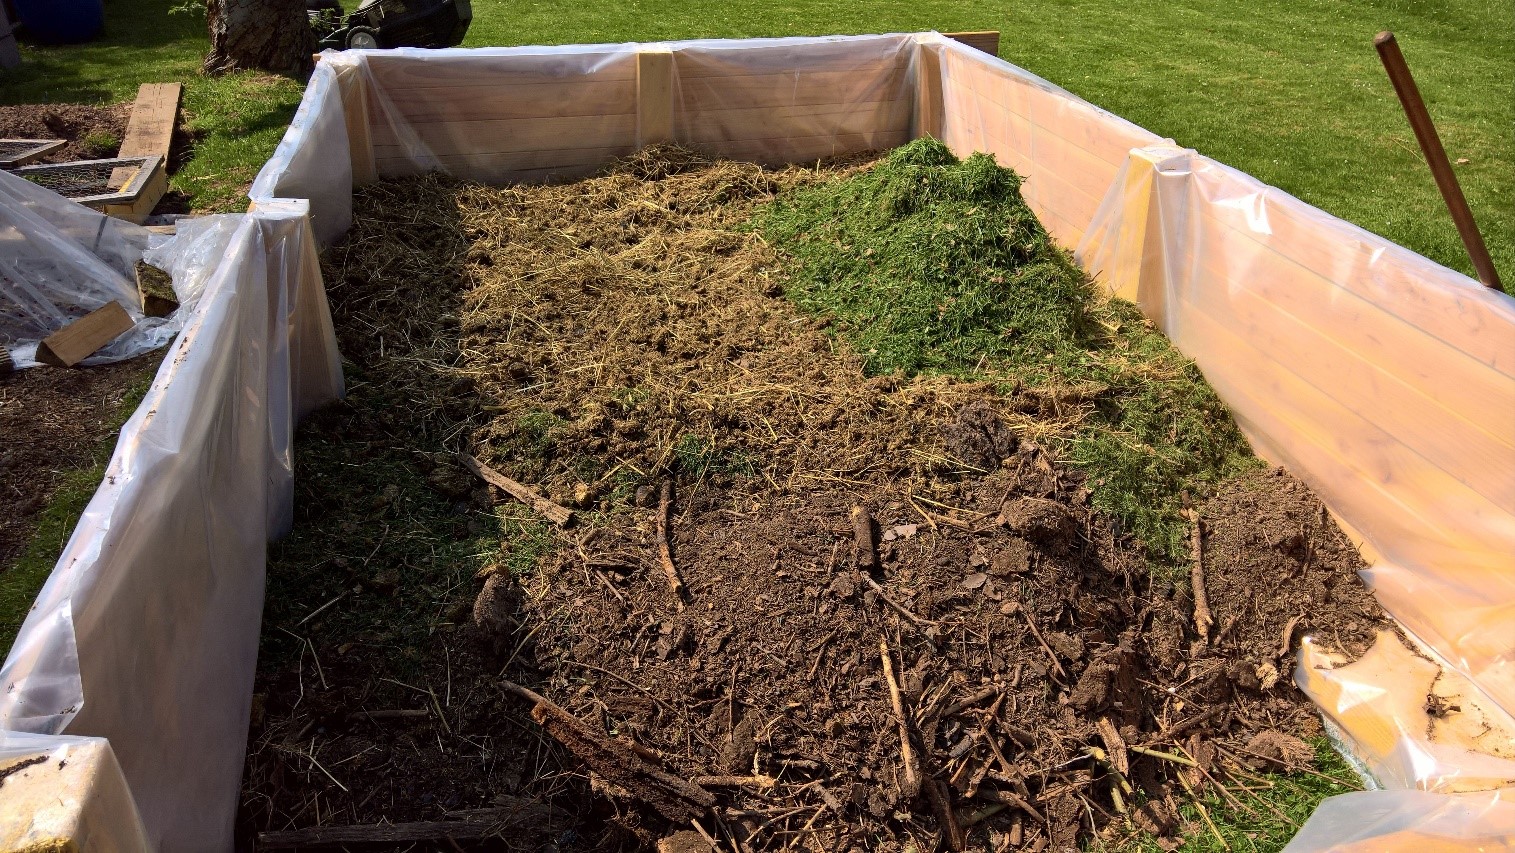
The lasagna gardening method is a technique of building a garden by adding layers of organic materials that will create soil that is good and full of life over time. The Fall season is the best time to start a lasagna garden.
The concept of a lasagna garden is to create a garden bed in layers:
1st layer: newspaper or cardboard
2nd layer: leaves and straws
3rd layer: food waste
4th layer: manure
4th layer: leaves and straws
5th layer: food waste
6th layer: manure
7th layer: topsoil
What you need
• Leaves
• Grass clippings
• Fruit and vegetable scraps
• Tea leaves and tea bags
• Coffee grounds
• Compost
• Manure
• Seaweed
• Newspapers
• cardboard
• Spent blooms
• Pine needles
• Peat moss
What you need to do:
1. Plan your Garden Bed
Decide on the shape of your garden bed (round, square, or whatever). Measure out space and mark the area.
2. Prepare the Area
Take out any significant bumps and hills with a square point shovel. Fill in the holes to make the ground as level as you can. You do not need to remove the weeds or grass because they will be covered anyway.
3. Gather your Materials
Almost all of the materials you need can be found in your backyard. What you cannot find, you can buy – such as manure, straw, and compost.
4. Lay the 1st layer
Place a thick layer of newspaper or cardboard on the ground. The cardboard will function as the ground cover that will keep away weeds. However, cardboard or newspaper will, over time, decompose and add to the soil.
5. Lay the 2nd layer
This layer consists of straw, bark, or dried grass clippings. This layer of water-absorbent materials should be about 2 inches to 3 inches thick.
6. Lay the 3rd layer
This layer consists of organic materials such as compost and grass clippings. This layer should be about 4 inches to 8 inches thick. This is the layer that will increase the productivity of your garden bed.
7. Sprinkle Water
Sprinkle a small amount of water over the 3rd layer (last layer). This will help break down the materials in the first three layers.
8. Add More Layers
Continue to layer until your tall, raised garden bed is of the height you want. Repeat the first layers 1 – 3 until you reach your desired height.
9. Plant a Cover Crop
When you are done layering your tall, raised flower bed, plant a cover crop. You can choose between a rye, crimson clover, and anything that winters well.
10. Wait for the Organic Materials to Decompose
After layering your garden bed, wait until Spring. This will give your tall, raised garden bed all Winter to decompose and allow the microbes to make rich soil. In Spring, your raised garden bed will be ready for planting.
Start planting your vegetables in Spring. After harvesting your crops, make sure to pack up your garden bed for the Winter.
Do this by piling all crop residue on top of your garden bed and turn under the soil. Plant a cover crop so that next Spring, your garden bed will again be ready for planting.
Tips on How to Fill a Tall Raised Garden Bed
• Wear gloves when filling your garden bed to prevent blisters.
• Make sure to start layering with a level surface. An uneven surface could result in erosion or runoff in your garden bed.
• Avoid adding plant materials infested with disease or pests as they may spread in your garden bed.
• Avoid using manure from carnivores because they can spread pathogens. It is best to use the waste of aged herbivore animals in your garden bed layers.
• Avoid using compost with dairy, oil, or meat.
• Avoid using organic waste with weed seeds. These weeds will spread in your garden bed unless they are “cooked” at high temperatures.
• Use a heavy material (wood chips) as the top layer of your garden bed. This will prevent lighter materials (dead leaves) from blowing away.
• A raised garden bed needs to occasionally be filled up. You need to replenish your lasagna garden annually by adding more green and brown layers.
• The best time to replenish your raised garden is during Fall because you will have a lot of green plant materials and dead leaves. You can also ask for garden and lawn waste from your neighbors.
• Add a few worms to your garden bed. Worms play an essential role in the food web of soil, and they enhance organic soil.
They also continuously improve and aerate soil structure improving oxygen flow, drainage, and moisture retention to the root system of plants.
Furthermore, worms break down organic matter faster as they populate, bringing more nutrients to the plants.
So here’s everything you need to know about how to do this – and more:
What is a Raised Garden Bed?
A raised garden bed is a freestanding frame or box with no top or bottom. It sits above ground and is filled with top-quality soil.
Benefits of a Raised Garden Bed
Raised beds are great for small spaces where a conventional row garden may not be feasible. There are also other remarkable benefits of having a raised garden bed.
• You can control the type of soil in a raised garden bed. As a result, it is easy to maintain soil fertility.
• Plants grown in raised garden beds mature faster because they are grown close together and compete for sunlight and nutrients.
• Deeper rooting and better drainage in raised garden beds make plants more productive.
• Growing seasons in raised garden beds are longer because the soil is raised above the ground, causing it to warm up faster.
• There are fewer weeds in raised garden beds because they are elevated.
• The soil does not get compacted, so greeneries grow better in raised garden beds than in-ground garden beds.
• Raised garden beds are more comfortable and easier to manage. You bend and kneel less, thus tending your garden will not cause back strain and pain.
Further in this article, we’ll explain how to fill a tall, raised garden bed.
Things to Consider before Filling a Tall Raised Garden Bed
There are some things you need to decide on before filling your tall raised garden bed:
• How tall should your raised garden bed be?
Raised beds are typically 11 inches tall. This height can provide enough drainage for most plants. There should also be about 12 inches of good soil below the bed, thus giving your plants at least 20 inches of soil.
It would be best if you also considered how much bending over you are willing to do.
If you are young and full of energy, kneeling and bending to tend your raised garden bed should not be a problem.
If you are not so young and prone to back strains or have mobility issues, you need to have a taller raised bed for easy gardening.
The taller your raised garden bed, the more volume it can hold. Remember, though, that soil becomes heavier when watered. This will exert more pressure that may cause your garden bed to bow outward near the top.
If your garden bed is longer than 6 inches and taller than 12 inches, you will need to place cross support across the width of the bed. This will keep the sides of your raised garden bed from bowing.
• What is the use of your Raised Garden Bed?
Know the usage of your raised garden bed before you start filling it up. Some plants are long-rooted, and some are shallow-rooted.
Consider the root systems of the plants you intend to plant in your raised garden bed to determine their root depth. Knowing their root depth will allow you to decide on your fill materials.
How much soil do you need?
Before starting to do anything, know how much soil and organic materials you will need.
To know how much soil you need (volume), multiply the width (ft.), length (ft.), and height (ft.) of your raised garden bed. The result will be in cubic feet. One cubic yard corresponds to 27 cubic feet.
You will need less soil if you add some branches, logs, wood chips, or twigs because these materials take up space in your raised garden bed.
Whether you are using the soil from your yard or buying it in bags, you need to calculate how much soil and organic material you need.
How to Make a Raised Garden Bed
A raised garden bed is the best way to go if you are a beginner gardener.
These are the materials you will need:
• Wood planks
• Rubber mallet
• Rebar
• Cardboard or newspaper
• Soil
What you need to do:
1. Choose a level section of ground.
2. Lay the boards on the ground.
3. Form a frame. Connect the boards using a rubber mallet.
4. Hammer down two pieces of rebar a few inches deep into the ground.
5. Line the bottom of the frame with cardboard or newspaper.
6. Thoroughly wet the newspaper or cardboard.
7. Fill up your raised garden bed with soil.
Best Time to Make a Garden Bed using the Lasagna Method
You can use the lasagna method to make a garden bed any time of the year. Fall, however, is the best time because, during this season, you will find many organic materials such as waste due to cleaning the garden and falling leaves.
You can also allow your garden bed to break down all Winter.
Winter snow and Fall rain will keep all materials in your garden bed moist, allowing them to break down quickly.
So, preparing your garden bed in the Fall will enable it to break down in Winter and then you can plant by Spring.
You can also opt to create your lasagna garden bed in summer or Spring. However, by doing so, you will require the adding of soft-like amendments such as topsoil or peat so you can immediately plant in your garden bed.
Building your garden bed in Spring requires adding many browns and greens with finished layers of peat, compost, or topsoil intermingled in them. Top your garden bed with three inches to four inches of topsoil or compost and start planting.
Advantages to Lasagna Gardening
All methods to fill a raised garden bed are great. And they basically make use of the same things in filling a raised garden bed – including natural organic matter and mulch.
Nature works the same way regardless of the filling method. The secret of a raised garden lies in the life-givers you include, such as worms, compost, and topsoil.
A lasagna garden bed is cared for in the same way as any other garden bed. Yet, it offers benefits not found in other garden beds.
• There are fewer weeds in these beds because they are suppressed by the cardboard or newspaper below and the mulch above the soil.
• Making and maintaining this garden bed is not too labor-intensive.
• The compost is rich in nutrients reducing the need for fertilizer.
• It has better water retention because compost holds water better than ordinary garden soil.
Knowing how to use the lasagna gardening method allows you to enjoy delicious organic vegetables.
Final Thoughts
If you have the garden type wherein you can do this and the required inclination and energy, go ahead and get busy in your garden, creating this tall, raised garden bed.
They look quite impressive, so they make your garden look very organized yet pretty at the same time.
More importantly, you will enjoy the benefits of your own labor in many ways that will make you proud.
Jenny Marie
Tribal Writer
Edited By
Patricia Godwin