
If you have not heard about a no-dig raised bed vegetable garden, it might be time to learn about this type of gardening system. Although most believe that gardening is all about digging, it is a common misconception.
Today, no-dig garden beds are gaining popularity since they are beneficial for the environment, better for the plants, and easier on your back.
In the previous years, one must till the ground before planting. The objective of tilling the soil is to loosen it and allow the compost’s nutrients and any decomposing plants to spread thoroughly.
The idea prevails since, during the initial year, the plants tend to grow at a faster rate. Sadly, in exchange for the faster growth rate, you are causing an imbalance in the soil while encouraging erosion, eliminating beneficial earthworms and nematodes, as well as unearthing weed seeds. Additionally, you are also placing significant stress on the plants.
The root systems of plants have a specialized function.
Only the upper roots can soak up the nutrient-rich topsoil. The lower roots take up minerals deep in the soil and serve as an anchor in securing the plant on the soil.
The exposure of all the roots to rich compost might trigger rapid growth, but it is not what the plant is evolved for. Remember that there is no better growing condition for a plant than the natural, well-balanced ecosystem of soil right below your feet.
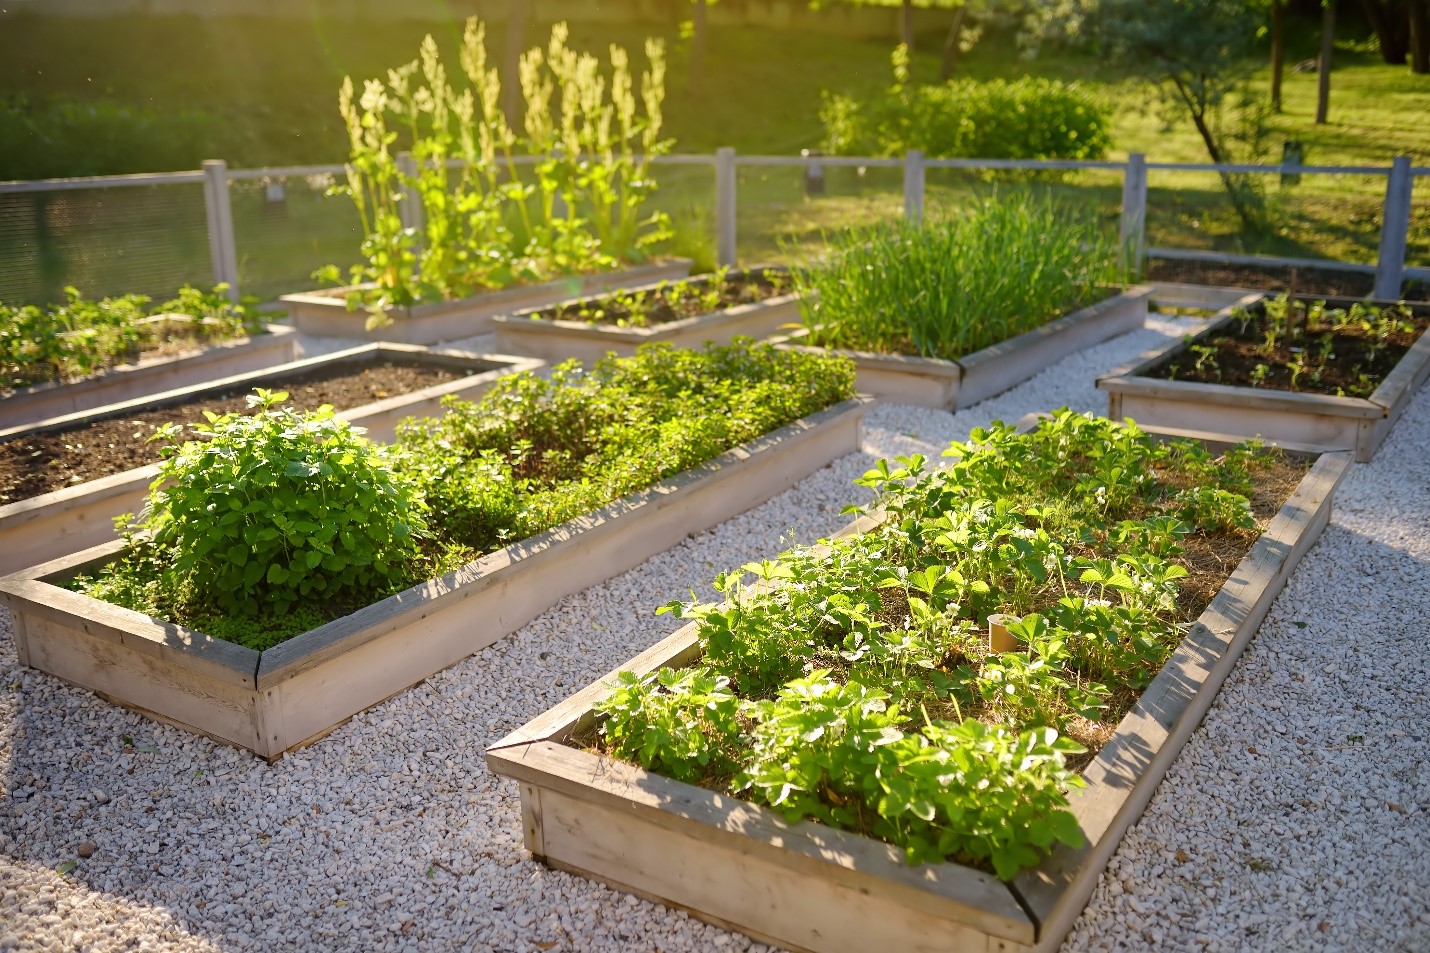
A close look at the no-dig raised bed vegetable garden
The initial model for the no-dig raised bed vegetable garden started back in 1977. Since then, several no-dig gardens were built worldwide, and the method is systematically time-proven and confirmed with good outcomes.
It has proven to be significantly productive in growing various types of plants and trees throughout the years.
There are various types of how to construct a no-dig raised bed vegetable gardens, but all utilize the equivalent primary standard, soil building. You can construct a no-dig garden on any location since the technique generates soil – a rich, healthy, nutrient-packed humus that plants genuinely love.
Please take note that they can be constructed over the soil, existing concrete, or lawn.
The technique in no-dig gardening that makes it work is that it involves a variety of organic materials such as animal manure, pea straw, lucerne, kitchen scraps, finely chopped pruning, and compost laid down in layers over each other to produce a flat, thick composting system that fills a garden bed.
When planting seedlings or plants into the garden bed, small holes or pockets are made to accommodate as much compost as a small-sized pot that you can cultivate the plant in.
Fill it with compost and the plants implanted into them. The process is relatively simple, and it can provide you with excellent results.
Generally, the no-dig gardening technique involves alternating layers of carbon-rich and nitrogen-rich components, similar to a well-made compost heap.
Why use the no-dig garden method?
For most organic gardens, the concept of a no-dig raised bed vegetable garden is appealing.
The method of gardening focuses on protecting the organisms present in the soil, and studies support this.
The method not only spares the worms, but studies show that the more often and deeper the soil is disturbed, the lesser earthworms are present. Regular compost mulches help increase the earthworm population.
In a no-dig gardening structure, it is crucial to have as many earthworms as possible. The earthworms are responsible for aerating the ground with their burrows.
It serves as channels for the roots and water and leaves out casts abundant in nutrients than the adjacent soil.
The earthworms also have nitrogen-fixing bacteria present in their guts that help them transfer a large amount of nitrogen to the soil from the plant litter they ingest.
Digging also disrupts mycorrhiza, which is the invisible fungus-like network that thrives symbiotically with plants.
Mycorrhizas grow steadily at only 15-20 cm in a year. When you dig through the soil, the networks are destroyed, preventing them from establishing widely, diminishing some of the plants’ ability to access nutrients and resist drought and pests.
The compost also helps in promoting better water retention. When you have a layer of compost, it will absorb most of the rainfall.
There are also several benefits of no-dig gardening that I will share below:
• Hassle-free gardening. Digging and tilling can be burdensome work. Without these two activities, a no-dig garden bed is an ideal choice for those suffering from back problems or those who do not want the hassle of laborious tasks.
• Reduces soil compaction. Although most believe that digging or tilling the soil is supposed to loosen up the soil, they turn the soil and compress it down. If tilling continues at the same level year after year, the soil below this level becomes compacted. In a no-dig garden, compaction is not likely to occur as long as the soil health is maintained and providing clearly defined footpaths to avoid trampling the soil.
• Soil aeration. A no-dig raised bed vegetable garden mimics how plants thrive in nature. Organic matter such as dead grass and fallen leaves rest over the soil and decays over time. The presence of organic matter on the surface encourages earthworms to move to the surface, creating channels that promote soil aeration.
• Reduces damage to soil life. In a no-dig garden, it allows life to foster in the soil without any disruption.
• Making the most out of rainfall. Tilling the soil leaves wide zones of bare soil exposed to direct sun, wind, and rain. The collective action of these elements will cause the top part of the soil to harden. The hardened crust prevents rainfall from soaking down to the roots. The soil that was not tilled remains crumbly, while the mulch layer on top helps retain moisture.
• Lesser weeds. In no-dig gardening, it piles layers of soil and mulch on the top of the weed seeds, preventing them from sprouting and restricting any persistent weeds attempting to germinate.
• Fewer pests. When the soil is not disrupted via digging or tilling, it seems to attract fewer detrimental bugs. The reason is that the plants are generally healthier and have a stable association with soil lifeforms that provide protection.
How to create a no-dig raised bed vegetable garden?
Constructing a no-dig raised bed vegetable garden involves a simple technique that does not take a long time to finish. Even if it is your first time building one, the steps are easy to follow.
It is important to note that there are two main construction structures when building a no-dig garden:
• No-dig garden built on paved areas, concrete or rocky terrain
• No-dig garden built on an existing garden bed or lawn
Remember that the only difference is that you need an extra layer first when creating one on hard or rocky terrain.
I will share below the step-by-step instructions when creating a no-dig raised bed vegetable garden.
1. Select and define the site
Select the ideal location to build your no-dig garden. I suggest building one on reasonably level terrain and must receive sunlight exposure up to 5 hours or more daily. You can create a no-dig garden over any surface, over current soil, concrete, lawn, or paved surfaces.
The first step of the construction process will vary depending on the surface you will choose.
It would be best if you marked out where the no-dig garden bed will be positioned. Make sure that you will construct it without sides or edging or build a raised bed. Mark out hard surfaces using chalk or utilize wood stakes or pegs. An alternative is placing a raised bed at around 20-30 cm high at your chosen location.
2. Gather the materials
When building a no-dig garden, you should prepare the following resources:
• Cardboard or newspaper
• Organic fertilizer or animal manure
• Straw blocks or lucerne (alfalfa hay), hales, or both.
• Compost
Some of the optional materials include:
• Kitchen scraps
• Rock dust
• Worm castings
In case you are going to build on the solid or rock-strewn ground, you also need the following:
• Dry miniature sticks and branches
• Old, desiccated leaves
• Dry seaweed (optional)
Do not forget a bucket of water to soak the cardboard. You can also use a watering can or hose for watering purposes.
3. Ground preparation
When preparing the ground, there is no need for additional preparation when creating over the soil. Let us check out the process when using other surfaces.
If you choose concrete, I suggest an additional layer of dry sticks, twigs, and old leaves at around 7-10 cm (3-4 inches) thick.
If you are going to build over lawn or grass, you can mow the grass at a very low level or leave it as is.
The next step is to fertilize it with a good amount of nitrogen-rich fertilizer such as blood and bone or manure and lime, then water thoroughly all over. Take note that the fertilizer helps the grass rot down once it is covered up and buried under all the layers on top of it.
4. Laying down the newspaper
At this point, you should lay down sheets of newspaper in layers around 0.5 cm thick and make sure that you will overlap the edges by 10-15 cm to prevent the grass or weeds from growing through. Soak the newspaper layer thoroughly with water.
The newspaper layer will hold moisture and function as a barrier to the weeds. It will slowly disintegrate over time. If you are going to use cardboard, you need to pre-soak it in a basin or bucket of water first, which is not easy. Another problem with cardboard is that it usually holds borax-based glue. With this in mind, it is usually a second option for this level.
As much as possible, utilize newspapers if available. Remember not to use glossy printed paper or office stationery since they contain harmful inks and bleaches that you do not want your plants to absorb.
5.Laying down the lucerne
You should lay down a layer of lucerne up to 10 cm or 4 inches thick over the newspaper. Do not forget to soak the layer thoroughly.
Other alternatives you can use include pea straw, hay, or even sugar cane mulch. However, lucerne is the preferred choice since it has a higher nitrogen content than the other straw materials and readily breaks down.
6. Lay down the manure and compost
Sprinkle a thin layer of manure. You have the option to add compost to produce a layer that is 5 cm or 2 inches thick.
Soak the layer with water thoroughly. If you want to include other ingredients such as worm castings, kitchen scraps, or rock dust into your no-dig garden, this is the layer that you can add to them.
Simply use a thin layer and avoid overdoing it. The worm castings and rock dust can also be utilized in the upcoming upper levels, but you should include kitchen scraps in this lower level only to make sure it stays buried to prevent vermin such as mice and rats from digging it up.
7. Laying down the straw
Place a layer of straw around 10 cm or 4 inches thick over manure or manure/compost layer. Thoroughly soak the layer after. You can use any material that contains carbon, such as hay, pea straw, or sugar cane mulch.
8. Lay down manure and compost
At this point, sprinkle another thin layer of manure. You can also add compost to create a layer that is 5 cm or 2 inches thick. Water the layer thoroughly. In case you want to include other elements such as rock dust or worm castings into your garden, you can add them to this layer.
9. Lay down straw
Place another layer of straw around 10 cm or 4 inches thick over the layer of manure or manure/compost combination. Make sure that you will thoroughly soak the layer with water. You can also add any material that contains carbon, such as hay, sugar cane mulch, and pea straw.
10. Create pockets of compost in the top layer and plant up
Create pits in the upper level of straw around 10-15 cm or 4-6 inches wide and uniformly deep. Add compost to the holes and plant the seeds or seedlings. Water thoroughly.
You can also include seaweed extract in the water when watering. The plants require more than the fundamental NPK (nitrogen, phosphorus, potassium) combination. It is important to note that seaweed contains almost every beneficial mineral, including all the trace elements that plants require and helping them develop healthy, strong roots.
With just ten simple steps, you can enjoy your newly constructed no-dig raised bed vegetable garden.
Several approaches to no-dig raised bed vegetable garden
It is important to note that the steps I shared above only serve as an outline of the various no-dig gardening blueprints. There are several techniques to build a no-dig garden, and there are various combinations on what to use for every layer.
Some no-dig garden structures can be free-standing, while others are low on the ground. Take note that all the varieties work since they utilize the combination of composting, interchanging levels of carbon-rich components, and nitrogen-rich elements.
How to convert a standard garden to a no-dig raised bed vegetable garden?
Creating a new garden from scratch does not usually happen most of the time. In most instances, you often encounter a desolate, run-down garden bed where the soil is depleted and compressed. Generally, nothing grows in it other than weeds. Please take note that it is easier to renovate a current garden and convert it into a no-dig raised bed vegetable garden.
I recommend following this technique to convert a garden bed into a no-dig plot. The process is simple since you will be placing up to two layers of mulch.
Transforming a standing garden to a no-dig system requires three fundamental steps:
1. Soil preparation
If needed, you have to loosen the compacted soil. In case the soil is not compacted, proceed to the second step.
Use a garden fork to loosen compacted soil manually, which usually takes a few minutes. You can cultivate green manure plants with profound tap roots that will penetrate the compressed soil and eventually break it down. However, this will take a longer time since the plant develops through its cultivating season.
Once the plants start to flower, it is cut down to the soil level and left on the soil surface, leaving the roots in the ground. The process is called ‘chop and drop.’ The roots will break down the soil and produce channels where air and water can pass through.
Over time, the soil will naturally loosen up.
• Cool season ‘green manure’ plants with deep tap roots that can break up compacted soil include lupins, fenugreek, and wooly pod vetch.
• Warm season ‘green manure’ plants that you can use is lucerne.
Make sure that you will provide an old garden a head start. Once the soil loosens up, it will never become compacted again.
If you use a garden fork to loosen the compacted soil, avoid turning it over. Remember that your objective is to make the soil loose and crumbly.
Once the soil loosens up, and the no-dig garden layer is added, they will start to break down, imparting organic matter to the soil. Over time, the earthworms will handle all the digging, bringing the organic matter from the surface and carrying it deep into the soil, steadily converting the soil below into rich, dark humus.
2. Laying down manure and compost
Scatter a light layer of manure. You also have the option to include compost to produce a layer of up to 5 cm or 2 inches thick, but a thinner layer works just fine. If there are plants already present in the garden bed, keep the materials away from the trunks or stems to avoid rotting at the plant’s base.
At this point, you can also augment other elements such as worm castings or rock dust.
Soak the layer thoroughly with water. You can also add seaweed extract to the water. It is packed with potassium, promoting flowering and fruiting, and other minerals that help the plants develop a healthy and robust root system.
3. Laying down straw
Apply a layer of straw up to 10 cm or 4 inches thick over the level of manure or manure/compost combination. In case there are plants already present, make sure to keep the mulch away to prevent rotting at the plant’s base.
Make sure that the layer is completely soaked in water. You can add seaweed extract to the water again if you want. Besides straw, you can also use any material containing carbon, such as hay, sugar cane mulch, or pea straw.
You can easily convert your existing garden to a no-dig raised bed vegetable garden in just three steps. Make sure to avoid stepping on the garden area to avoid compacting the soil again. The best way to avoid compacting the soil is to create footpaths.
How to maintain a no-dig garden seasonally?
A no-dig raised bed vegetable garden is easy to maintain. Generally, it is a twice-in-a-year task that you can handle. As spring or autumn starts when the previous season’s crops were collected, and the levels of materials on the soil surface have decomposed, it is the best time to add new material to restore the layers of your no-dig garden.
When replenishing the layers of your no-dig garden at the start of spring and autumn, simply follow these steps:
• Add a layer of manure or compost.
• Place a layer of straw over the manure/compost layer.
• Soak the layer with water
With a no-dig garden, you do not have to work hard and spend less time in the garden while also saving energy and water, maintaining a healthy soil ecology, and allowing nature to do its work.
Final Thoughts
When it comes to a no-dig raised bed vegetable garden, it has its share of advantages over the standard method of gardening involving digging and tilling of the soil. The basic structure of the no-dig gardening that I shared will serve as your guide if you want to try it out at home.
Corinne A
Tribal Writer
Edited by
Patricia Godwin