
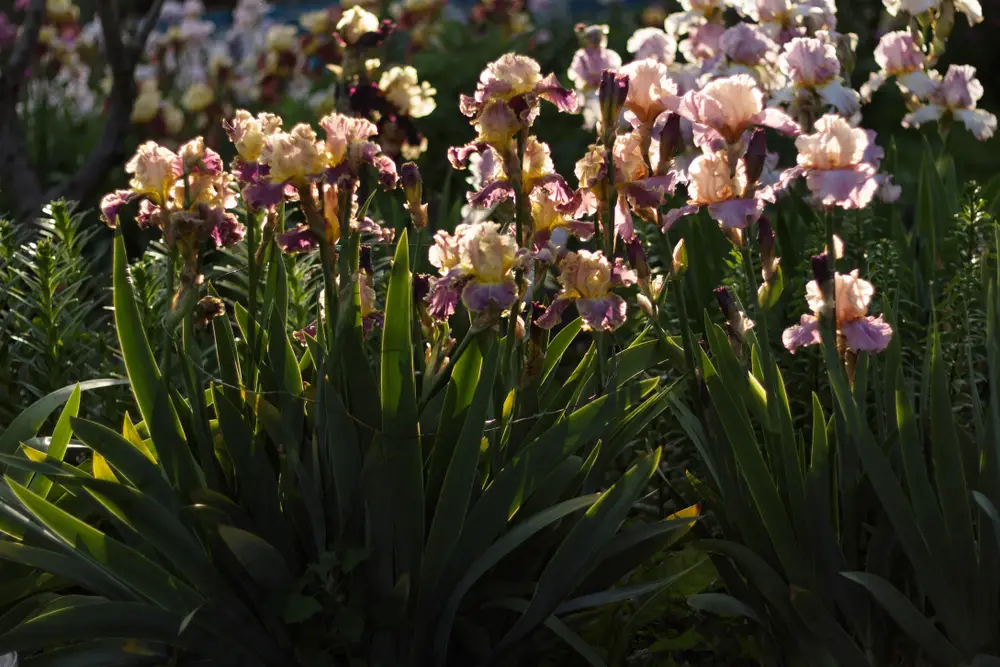
The beauty of Irises and Iris flowers has been captured in famous paintings because of these flowers’ magnetic and attractive beauty.
Many gardeners love to plant Irises and find it hard to resist the wonderful attraction of these beautiful and tall flowers – like a brilliant purple meadow swaying in a warm breeze.
To cut back Iris plants, you need first to trim them and then divide the Irises. Full step-by-step details below.
How to Cut Back Irises
Keeping your Iris flowers in tip-top shape, get into the habit of trimming back your Irises.
This task does not require a lot of gardening experience.
It could be undertaken with standard gardening equipment, like pruners and a gardening fork.
Here are the two simple methods and guide on How and When to Cut Back Irises.
METHOD 1. Trim Your Iris Plants.
Step 1. Remove immediately broken or diseased leaves.
Always keep an eye on your Iris plants even after they stop blooming and look for leaves that show signs of diseases.
Take a pair of pruners and clip these leaves down so they only emerge 2 inches out of the ground.
Cutting back damaged or sickly Iris foliage could help prevent the disease from hurting your plants in the next growing season.
Step 2: Trim the Iris entire plant so only 2 inches appear above the ground.
Take your pair of pruners, cut straight across each Iris leaf, and leave about 2 inches of the leaf above the ground.
Thus, the plant roots don’t have to expend energy to keep the leaf alive.
You could use any shears or trimmer as long as it cuts your plants in a straight or even line.
Step 3: Do make angled cuts on the sides of your trimmed irises. This is to create a fan shape.
Just cut along the left and right sides of your trimmed iris plants at a 45-degree angle, which creates a fan shape.
It helps make your Irises look more uniform. This could prevent diseases from spreading on the leaves.
Step 4: Throw away or compost the trimmed Iris leaves.
Collect all the leaf cuttings in a trash bag as you cut them off. Place the leaves out completely, or add them to your compost bin.
Step 5: To wait until spring for your Irises to regrow.
Give your Irises the time to recharge and grow back with fresh, healthy leaves and buds.
METHOD 2. Divide Your Irises.
Step 1: Choosing the right time in late summer to divide your Irises.
Wait for your Irises to stop blooming. This period is the best as the Irises would not be as likely to develop any bacterial rot.
Step 2: Garden experts recommend that you should divide your irises every 3-5 years.
It prevents the Iris flowers from overcrowding one another.
A reminder: Don’t divide your Iris plants in winter. During this period, they are about to start regrowth. Separating them will cause a setback.
Step 3: Use a large garden fork to dig up your Irises, then place it beneath the soil of your Iris plant.
Slowly lift and carefully remove a clump of flowers from the ground.
Then, set this clump aside in an open area where you can examine and sort each flower.
Because of the way they grow, all of your Irises will be in clumps instead of growing as individual flowers.
Step 4: Pull apart the clumps of Irises to have individual rhizomes.
Remove your trimmed flowers from the clump. Then pull apart any Irises that are stuck together with your fingers.
Take note that each Iris must have a thick, healthy rhizome along with multiple thin roots threading out from the bottom.
This process is to split apart individual rhizomes, making your irises easier to replant.
Step 5: Inspect and clean your Irises.
Brush off any dirt and rinse off each individual plant in an empty basin.
Find out for any signs of rotting or infestation. When the plant looks healthy, set it aside for replanting.
Step 6: Replant your Iris.
Spread out the roots in the soil and place the base of the rhizome about 1 inch into the soil.
Step 7: Water your irises after planting.
Water each Iris until the top 3 inches of soil is damp.
Afterward, leave the irises until the weather is dry and warm. You could cut back on watering if you experience a lot of rainy weather.
Irises need to be watered on an as-needed basis, but not daily.
This attractive plant generally blooms in late spring and early summer. Some Iris plants produce flowers for a second time in late summer.
Growing from rhizomes or bulbs, this perennial plant has a rhizome – a horizontal underground stem that has nodes that produce roots and a shoot.
The bulb is a compact and highly modified stem with leaves that produce roots and a shoot when activated.
The Iris leaves are generally tall, narrow, and sword-shaped.
Its flowers come in all colors except for red. Some Iris flowers have a dark, red-brown color and have six attractive and colorful lobes.
Here are the three primary reasons why you should cut back on Irises
Reason 1: Irises typically put on a show for two to three weeks every spring.
But, once their blooms fade, the plants look less attractive. Cut off the spent flowers to keep the
garden looking its best.
Reason 2: Disease prevention is one factor that plays a vital role in cutting back on Irises.
We are aware of the several common Iris diseases that can be reduced or eliminated by proper Iris care, including pruning.
Reason 3: Knowing when and how to cut back on Irises is vital for your garden’s healthier and more beautiful Irises.
Moreover, this is essential for preventing a dreaded pest known as the Iris Borer.
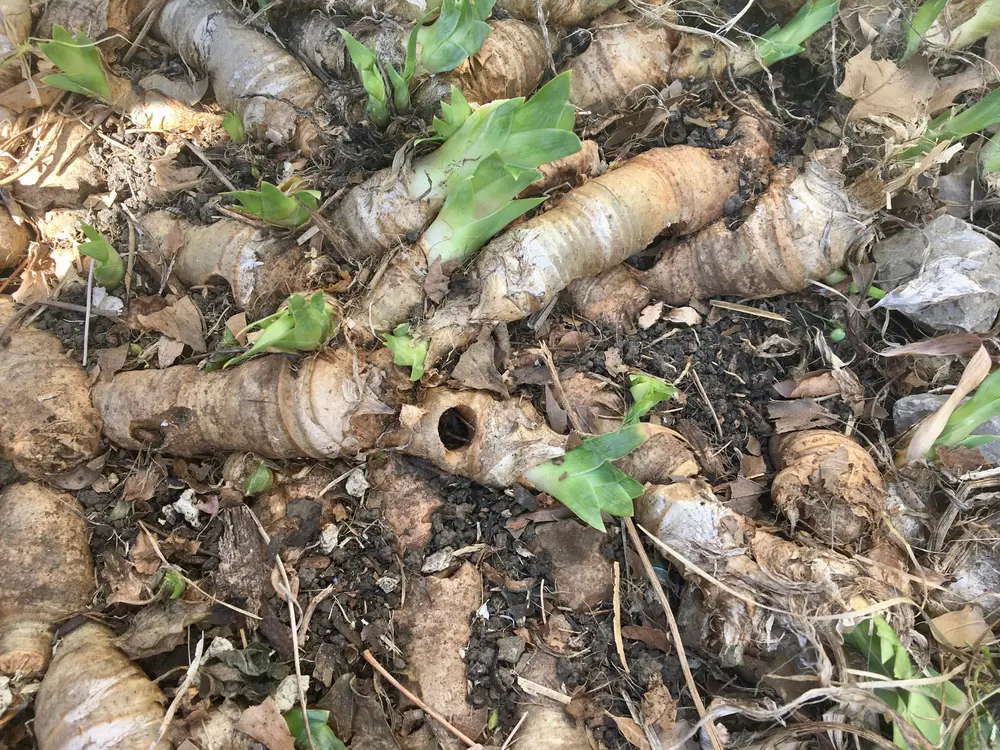
This iris borer is the larva of the Macronoctua Onusta moth. It destroys the rhizomes from which the lovely Iris grows.
The larva hatches in April to May when the Iris leaves start emerging.
This larva enters the leaves and tunnels into the plant causing structural and cosmetic damage in its path.
Thus, the larva also creates a bacteria that causes a soft, foul-smelling rot. Iris Borer also mimics some common diseases.
Let us learn how and when to trim irises to help them achieve peak performance.
When to Cut Back Irises?
The right time to cut the flower stalks is in the Fall, a few days after all the blooms have finished.
Cut the flower stems or flower stalks down at their base. However, do not forget NOT to trim Iris leaves after they have finished blooming.
Their leaves carry on photosynthesis and generate energy for next year’s growth.
Just cut off brown tips and cut the flowering stalk down to the rhizome to discourage rot.
Manifestation of diseases.
Irises are prone to several different plant diseases such as bacterial leaf blight, botrytis, ink spot, soft rot, and leaf spot.
These are the common diseases that leave iris foliage marred with brown spots or streaks.
It may cause the rhizomes to turn mushy and make the Irises look downright ugly.
We know that all of these diseases are encouraged by wet weather or damp, humid conditions and water management.
Good air circulation is the key to preventing these diseases or lessening their damage.
Remove Immediately any Iris leaves that show signs of disease spots, streaks, or blotches. Throw them away or into the garbage.
As much as possible, cut them off as close to the rhizome. Continuous removing discolored foliage as soon as it appears.
It is recommended by some gardeners, not to water Irises in the evening and use drip irrigation or a soaker hose instead of an overhead sprinkler. The drier the foliage the better.
Infected by Iris Borer
Iris borer is a species of moth larvae that feed on the rhizomes of the Iris plant. It causes The Iris foliage to turn slimy and yellow. Often, there is a putrid smell around the plant.
The female moth lays its eggs on Iris foliage in late summer and hatches in spring.
These tiny caterpillars burrow into newly emerging leaves.
Begin working their way down to the base of the leaf and into the rhizome. A single borer could carve out the inside of an entire rhizome. It leaves a stinky, smelly mess behind.
Knowing when to cut back on Irises is easy to prevent more borers. You know the eggs overwinter on the foliage. It is important that you cut back on Irises in the Fall.
You should trim off the leaves all the way back to the rhizomes, and toss them in the trash can or bury them. If you find or come across a soft, rotten rhizome, dig it out and throw it away.
Final Thoughts on How and When to Cut Back Irises
There are many reasons why you should learn when to cut back on Irises and how to do it properly.
You could improve the health of your plants and the beauty of your garden.
Always keep your Irises in good shape and remember to divide them every few years. This practice is so important to prevent disease further and encourage better blooms.
Hopefully, this article and guide could be of great help to you. Enjoy gardening!