
Have you ever wondered about the name of those tiny cabbages? They are called Brussel Sprouts, named after Brussels, the capital city of Belgium, in Europe. They have been growing there since the 13th century.
Here Is A Detailed Account Of The Four Growing Stages Of Brussel Sprouts:
The four growing stages of Brussel Sprouts are Planting, Early Growth care, Sprouts Formation care, and Harvesting. Through each phase, our step-by-step guide (below) simplifies the processes for any potential grower.
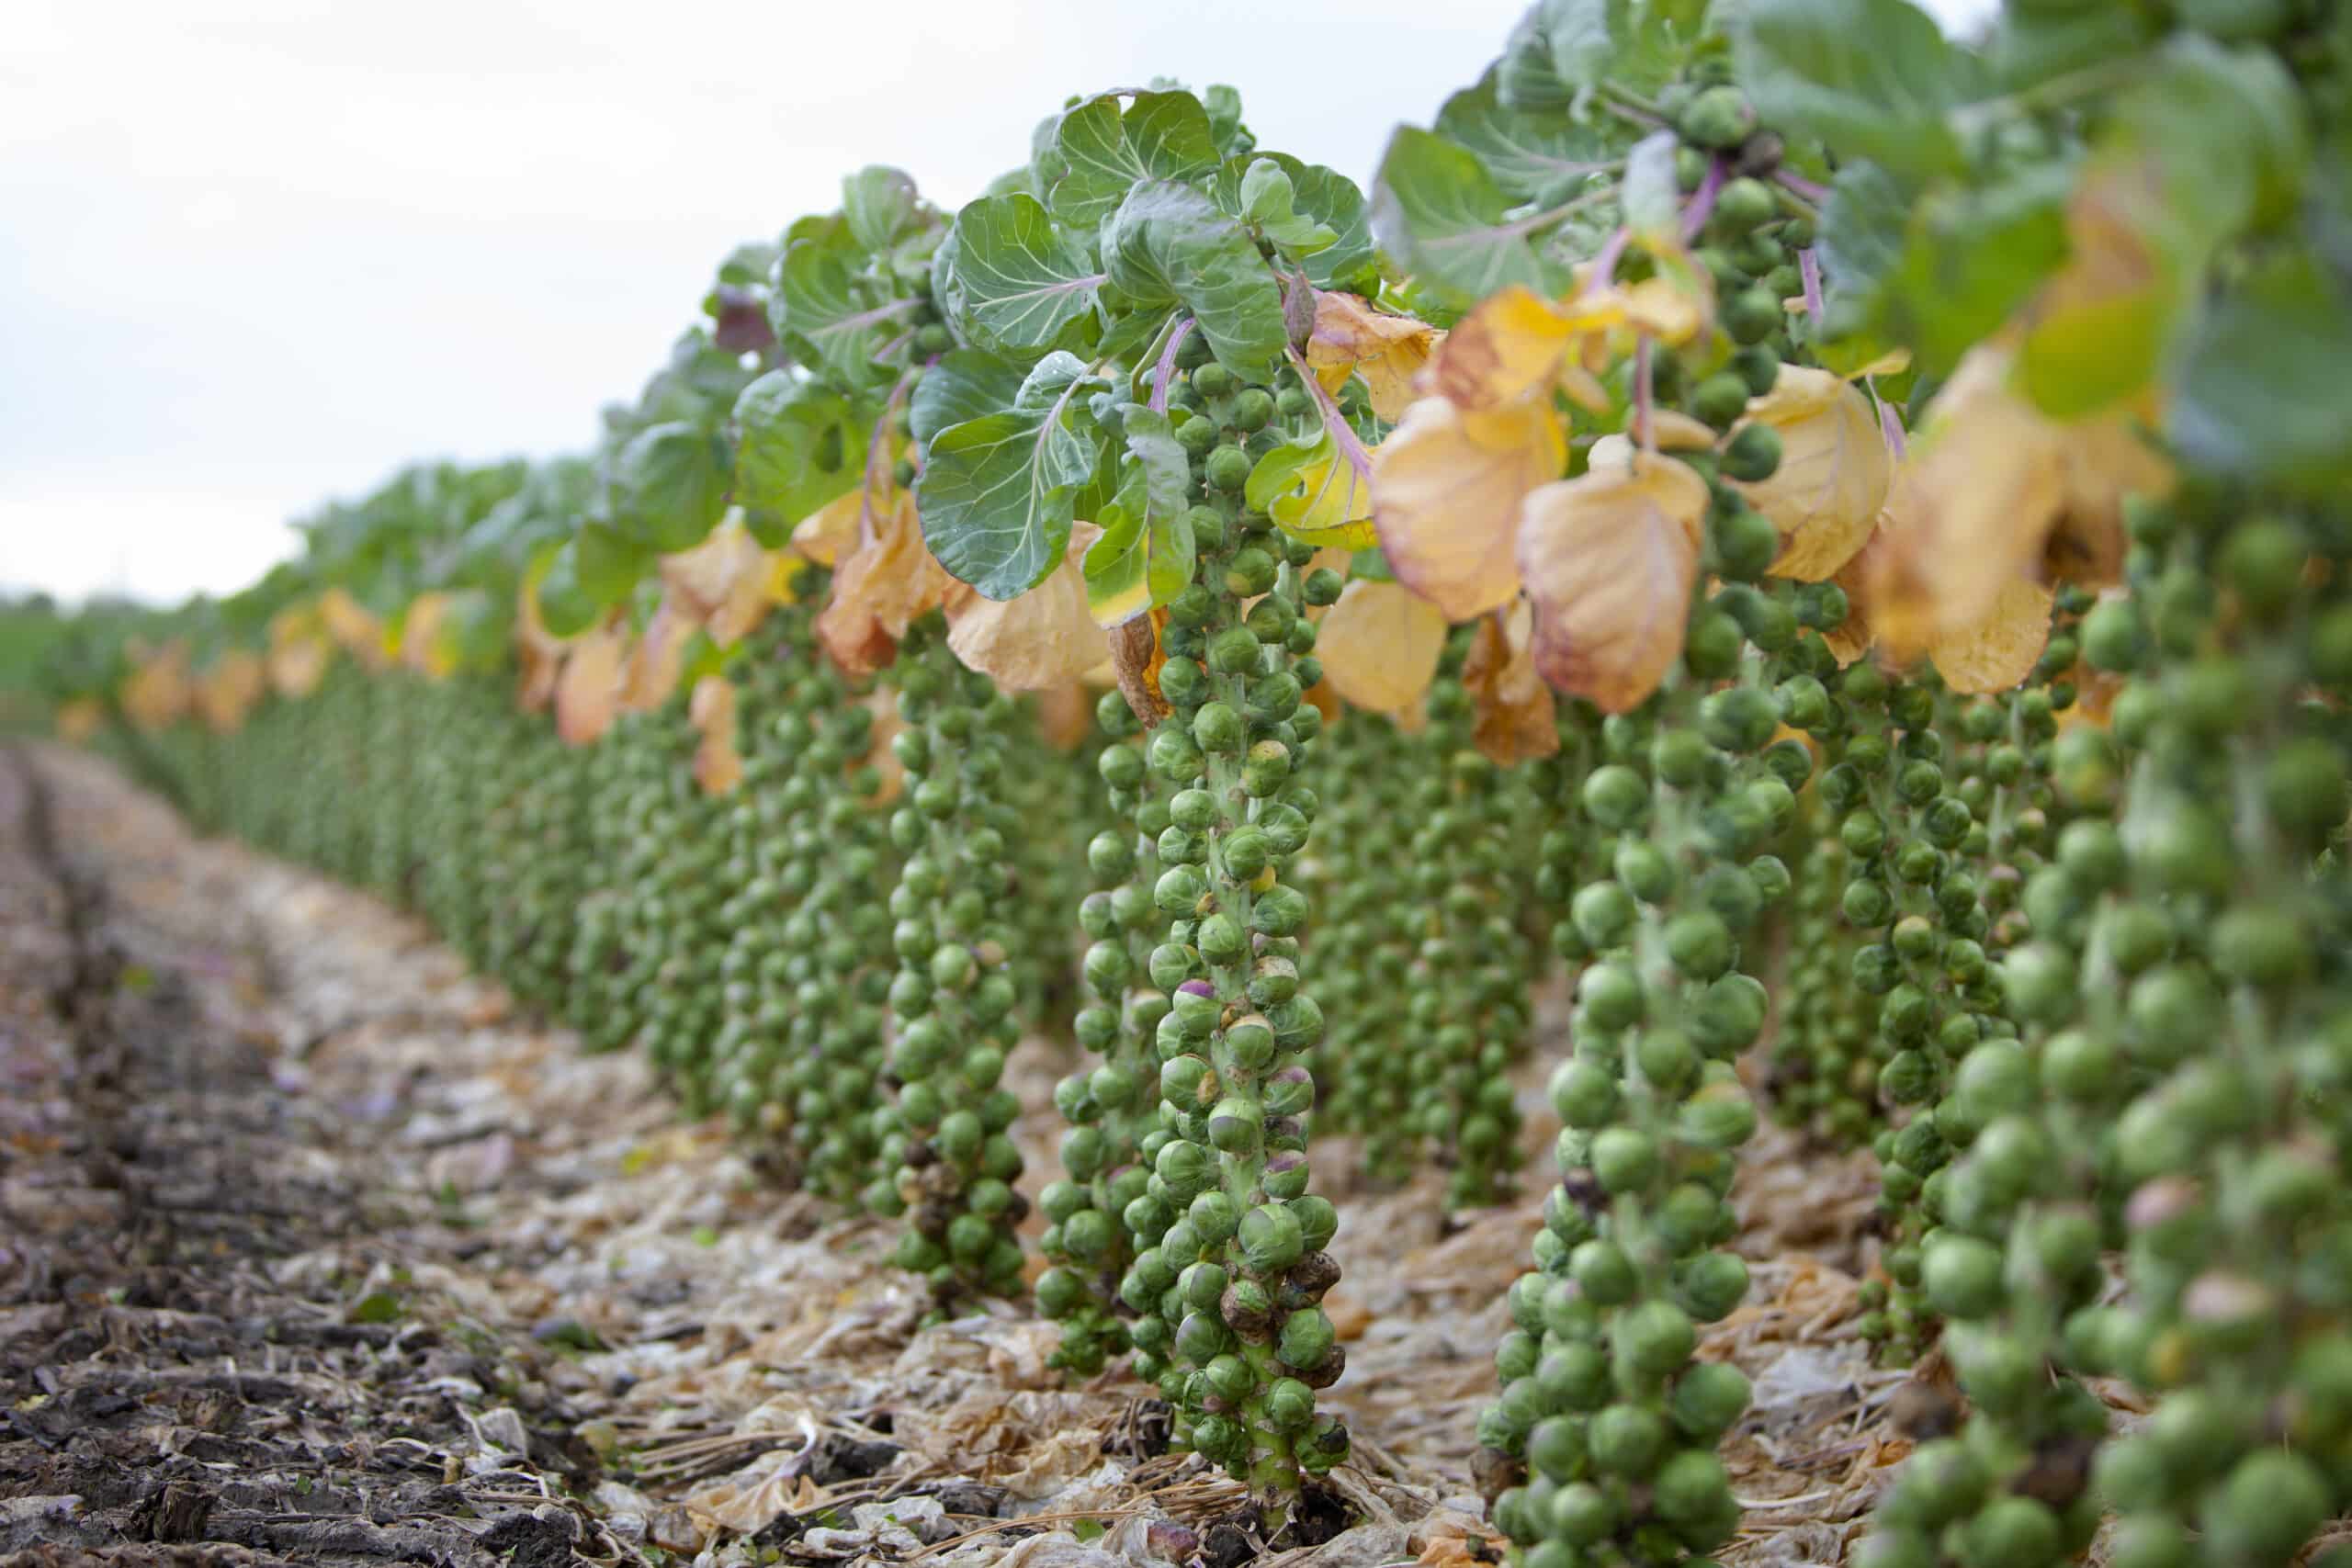
Before you begin – for those unfamiliar with Brussel Sprouts – you must know what to expect; they grow by sending up thick stalks – which can reach heights of up to 60 to 120 cm (24 to 47 inches). The tiny cabbages start sprouting on these stalks, forming a sort of spiral staircase (helical patterns).
Brussels sprouts are a cool-season crop that belongs to the Brassicaceae family, also known as the mustard family. They are scientifically known as Brassica oleracea var. gemmifera and are closely related to other vegetables such as broccoli, cauliflower, and kale.
Brussels sprouts during the four growing stages require adequate sunlight and well-draining soil to develop properly. Once the sprouts begin to form, it is important to thin the plants, maintain proper spacing, and apply fertilizer as needed to encourage healthy growth.
The sprouts themselves grow from the leaf axils of the plant and develop into miniature cabbage-like structures that are best harvested when they reach a size of 1-2 inches in diameter.
They are delicious to eat – especially when cooked and respond well to frying, roasting and in a sauce – much more flavour than just boiling.
Stage 1: Planting Brussel Sprouts
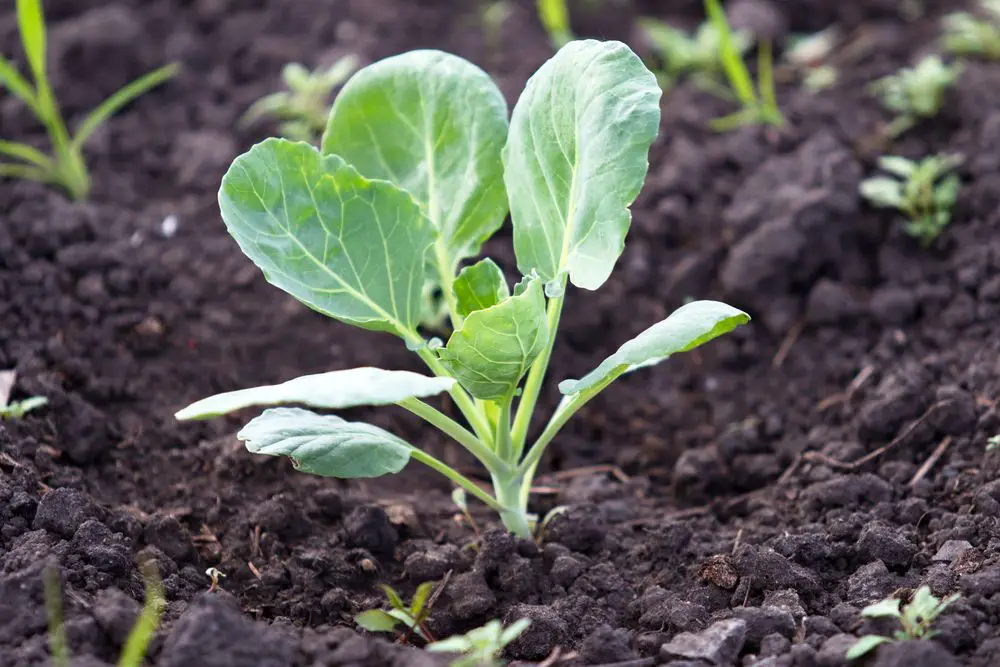
The first stage of Brussel sprout growth, including most plants, is planting. The Brussel Sprouts seeds can be grown indoors or outdoors, provided you do it in the right conditions.
Since Brussel Sprouts have a long growing cycle, you should plant them three months before the cold weather arrives.
This is to ensure that you will harvest them during the frost season, and the taste of Brussel Sprouts is guaranteed to be delicious.
Many online applications can help you with times to plant – depending on where in the world you are.
Or, you can consult your local experts to help you determine the best planting time in your area.
You have to remember when growing Brussel Sprouts that timing is critical.
After knowing the perfect timing to plant, the next thing you need to consider is the plant site. Brussel Sprouts should be grown with adequate sunlight for better development.
You can still grow them in shaded areas; however, they will develop more slowly than expected.
The drainage system is also vital in keeping a healthy Brussel sprout so keep that in mind.
For the seeds to germinate, the temperature should be around 45 to 85 degrees Fahrenheit. Once the correct temperature is met, expect the seedlings to appear after five to eight days from planting.
Note: We will discuss planting Brussel Sprouts in a different section. For now, it is enough to know this first stage of Brussels Sprouts’ growth.
Stage 2: Early Growth
This stage is the most crucial part of Brussel Sprout’s growth. Proper caring and attention are required to have higher chance of healthy development.
You must nurse Brussel Sprouts during their early growth and assist them properly before they mature.
Brussel Sprouts will reach 2 to 3 feet when they mature, and there are many things to do before that happens.
First, when the Brussel Sprouts have reached 4 to 5 inches tall, you should thin the seedlings by pulling out the unhealthy ones. Thinning is removing weak plants because they have lower chances of surviving.
After thinning, all you have left is nothing but the healthy ones.
The next thing to do is plant them 12 to 14 inches away from one another. This gives them enough space to grow and prevents roots from colliding altogether.
Moreover, add mulch around the healthy plants to help retain moisture and keep the weeds away. However, mulching may not be necessary if you live in high humid places, but see that you pull every weed out.
Eventually, the Brussel Sprouts will develop small cabbage-like leaves on top. That is a sign of healthy growth, but many tasks are still to do before reaching the harvesting stage.
For example, after two to four weeks from planting, the Brussel Sprouts will grow 12 inches high. When this happens, they essentially need fertilizer to boost their growth. You can use a commercial ammonium nitrate or liquid fish emulsion as fertilizer.
Stage 3: Sprout Formation – Brussel Sprouts
This stage is when things get more interesting. Want to know why? Because this is when they will begin to form sprouts—a miniature cabbage.
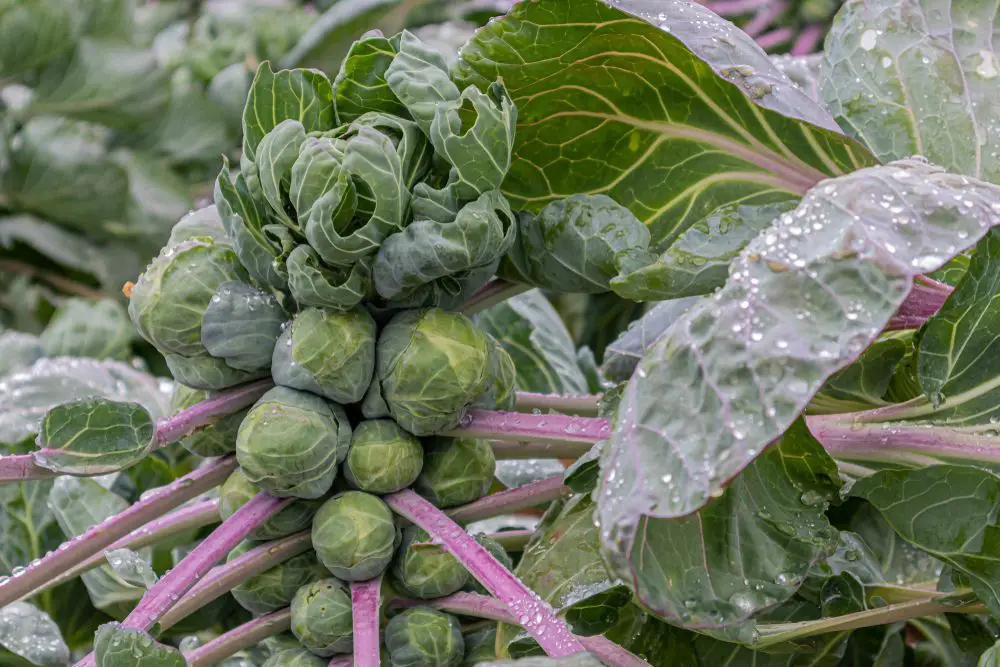
Typically, they will begin to develop sprouts at the 50-day mark after planting, depending on the variety.
The miniature cabbage-like sprouts will grow from the leaf, joining the center stalk right at the left axil. The Sprouts will start to form from the base of the plant and then upward throughout the trunks.
Remember, you still need to wait for 30 to 50 days more before you can harvest them.
While waiting for that to happen, you need to do the following to encourage fast growth:
• Remove the top growing peak of the plant when sprouts have grown 10 to 12 inches from the plant base.
• The reason behind this is to minimize overgrowth so that the sprouts can have sufficient nutrients as they mature.
• Moreover, as the sprouts grow, remove the lower leaves to prevent the Sprouts from crowding each other.
After that, you are set to wait for the harvesting period.
Stage 4: Harvesting Brussel Sprouts
The happy stage begins at this point. Who doesn’t love Harvesting?
After days of waiting and taking care of the plant, you finally reach the last stage of the Brussel Sprout growth—the harvesting stage.
The plants are now 90 to 100 days old, and the temperature should be cold. The Sprouts should be at least 1 to 2 inches in diameter with firm green compacted leaves. They have been growing from the bottom to the upper part of the stalk.
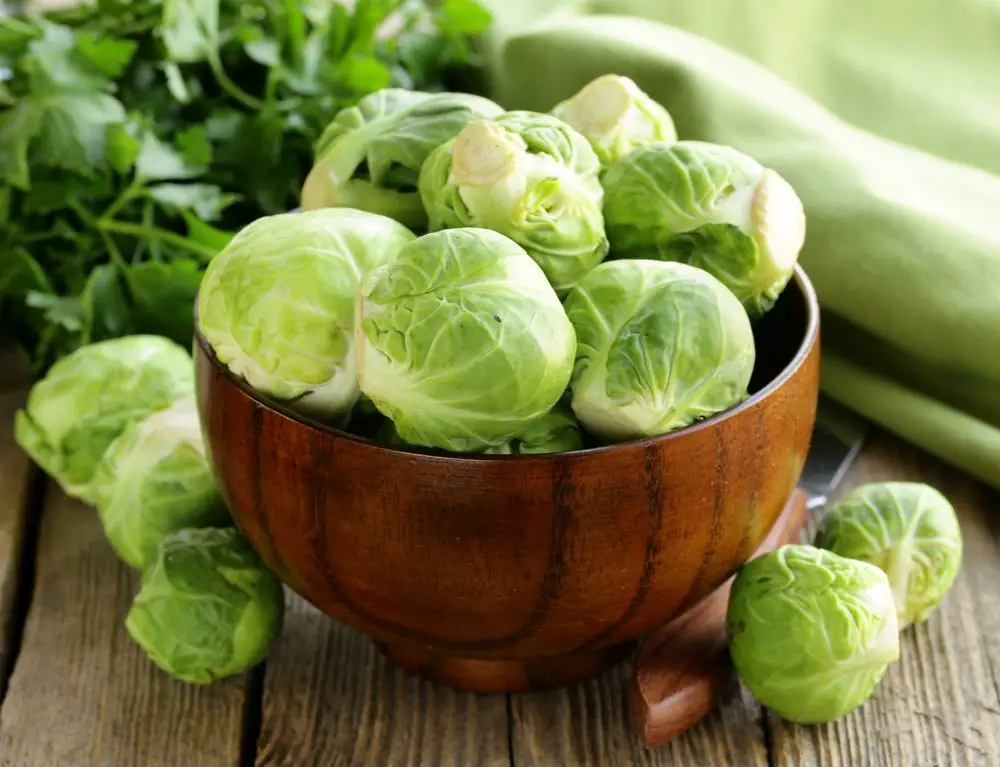
These Brussel Sprouts can be harvested when they are the size of large marbles, but they are more flavorful being reaped when their size is closer to that of a golf ball.
They can be picked by hand into baskets; several harvests are made of between five to 15 sprouts at a time.
Furthermore, while harvesting the Sprouts, begin at the base of the plant and proceed upward but leave the sprouts that have yellow leaves because they are no longer flavorful.
The other, smaller sprouts you leave on the plant will continue to grow and mature, affecting their flavor so that you can harvest all of them at once.
How To Plant Brussel Sprouts
There are two stages in planting Brussel Sprouts; seedling and transplanting. The following information is about those two stages and how to perform both of them effectively.
For Seedlings:
1. Fill your growing pot with a sterile seed starting medium.
2. Sow the seeds for about half an inch deep.
3. Water the seedlings using a mist or sprayer for gentle watering. Keep the soil moist until germination happens.
4. Place the pot where the temperature is around 45 to 75 degrees Fahrenheit.
5. When the plant has 2 to 4 sets of true leaves, they are ready for transplanting.
For Transplanting:
1. Dig a hole about an inch and a half deep plus the size of the seedling pot.
2. Place the seedling in the hole and gently cover it with soil.
3. Make an 18 to 24 inches spacing between each plant and apply mulch around the plant.
General Facts About The Brussel Sprout
The Brussel Sprout is a member of the cabbage family and a close relative of cauliflower, broccoli, and kale. They are best grown in cool and humid places for better taste.
Despite being small, Brussel Sprouts have a long growing season that would take about 80 to 100 days, depending on the variety. Since they improve taste after a light frost, harvesting them during cool weather is best.
The largest producers of Brussel Sprouts are in Continental Europe. The Netherlands is the biggest at 82 000 metric tons and next is Germany at 10 000 tons.
The UK produces an amount comparable to the Netherlands’ volume, but they usually don’t export any Brussel Sprouts.
In North America, the production of Brussels Sprouts started in the 18th century in Louisiana, when Settlers from Belgium and France re-established themselves there.
Then in the 1920s, California’s central coast started growing them, reaching a noteworthy production in the 1940s. San Mateo, Sant Cruz, and Monterey have a vast amount of crops due to ideal conditions. Interesting to note that the US production of Brussel Sprouts is about 32 000 tons, valued at about $27 million!
Final Thoughts on the 4 Growing Stages of Brussel Sprouts
The growing stages of Brussel Sprouts are so plain and straightforward that anyone interested can try their hand at growing them. They have such a remarkable flavor when properly cooked that everyone should try them once.
Now that you know the growing stages of Brussel Sprouts, what should you do next? Start planting them, of course!
{On a personal note: In the UK, decades ago, my Grand Parents grew Brussel Sprouts (and many other veggies). As a small child of three to four years old, I picked the ripe Sprouts and put them into baskets – so even a small child can do it! Moving between the stalks to harvest the Sprouts correctly, I recall some were as tall as me while others came up to my shoulders}
Our editor, Patricia Godwin, brings a wealth of experience to this topic. She owned and ran a successful landscaping and gardening service for many years, where she had the opportunity to test various techniques and products for growing vegetables, including Brussel Sprouts.
Read More:
Cabbage Growing Stages (8 Easy Stages)
Broccoli Growing Stages (In 4 Easy Stages)
The following sources were consulted during the research for this article:
1. University of Illinois Extension – Watch Your Garden Grow: Brussels Sprouts: https://web.extension.illinois.edu/veggies/brussels.cfm
2. Clemson Cooperative Extension – Brussels Sprouts: https://hgic.clemson.edu/factsheet/brussels-sprouts/
3. PennState Extension – Growing Brussels Sprouts: https://extension.psu.edu/growing-brussels-sprouts
4. National Gardening Association – Growing Brussels Sprouts: https://garden.org/plants/group/brussels-sprouts/